Building a Real-Time Object Detection and Tracking App with YOLOv8 and Streamlit: Part 3
Demo WebApp
This app is up and running on the Streamlit cloud server!!! Thanks ‘Streamlit’ for the community support for the cloud upload. You can check the demo of this web application on the link below.

Introduction
Object tracking is the process of identifying a specific object or multiple objects in a sequence of frames over time. It involves locating the object’s position in each frame and keeping track of its movement across frames. Object tracking has a wide range of applications in various fields, including surveillance, robotics, autonomous driving, sports analytics, and more.
Tracking algorithms use various techniques, such as colour histograms, motion analysis, deep learning, and others to locate and follow objects in video or image sequences. With the growing use of object detection and tracking in various industries, the need for accurate and real-time tracking algorithms has become more crucial than ever.
The ability to track objects accurately and quickly is essential for applications such as security surveillance, where it can help identify potential threats and detect suspicious behaviour. In the field of sports analytics, object tracking can be used to analyze the movement of players during a game, providing valuable insights into player performance and game strategies.
How The 3 Parts of This Blog Series Are Organised?
In this series, we will build a real-time object detection and tracking application using YOLOv8 and Streamlit. The main goal of this project is to provide a simple and efficient implementation of real-time object detection and tracking that can be easily customized and integrated into other applications.
This blog series is divided into the following three (3) Parts.
- Part 1: Introduction and Setup for YOLOV8 & Streamlit
- Part 2: Exploring the YOLOv8 Model and Object Detection
- Part 3: Adding Tracking Algorithm To The Object Detection
Part 3: Adding Tracking Algorithm To The Object Detection
In the previous two parts of this series, we have covered the basics of object detection using the YOLOv8 model and how to implement it with Streamlit to create a real-time object detection app. However, object detection alone is not sufficient for many practical applications. In scenarios such as surveillance or autonomous driving, it is important to not only detect objects but also track their movements over time. This is where object tracking comes in.
In this third and final part of the series, we will explore the fundamentals of object tracking and how to integrate it with our existing object detection app using the OpenCV library. By the end of this tutorial, you will be able to create a complete real-time object detection and tracking app, ready to be deployed in various scenarios. So, let’s dive into the world of object tracking and take our app to the next level!
Implementing Object Tracking with YOLOv8 Architectures
We already know that object tracking is an essential aspect of computer vision that involves locating and tracking the position and movement of an object in a video or a sequence of images. YOLOv8 is a popular object detection model that offers a straightforward implementation of the tracking algorithm with two different architectures ( for now, as it may increase in future):
- BoT-SORT and
- ByteTrack
BoT-SORT and ByteTrack both provide a robust and efficient tracking algorithm that can be easily integrated into your computer vision project. The default tracker is BoT-SORT, but you can choose ByteTrack if you prefer.
Getting Started With YoloV8 Tracking
To get started with tracking objects using YOLOv8, you can create a simple Python script that applies the tracking algorithm on a video and displays the output in a default OpenCV window.
In the code, you need to specify the path to the pre-trained YOLOv8 model and the path to the input video. You can then adjust the confidence and IOU threshold to suit your tracking requirements. Finally, you can specify whether to persist the tracking results, show the tracking output in a window, or save it to a file.
Begin by creating a new file called yolov8_tracking.py. Once created, start adding the necessary code to the file.
That’s it!
Once you run this script, you will see that the tracking algorithm is applied on each frame of the video and the video is displayed in an OpenCV window. This can be a great starting point for building more complex object-tracking applications using YOLOv8.
Implementing the Object-Tracking In Our Streamlit App
In order to display the frames with object tracks in our Streamlit app, we need to take a slightly different approach. Rather than processing an entire video as we did in the previous implementation, we will instead pass individual frames one by one to the YOLOv8 model, and then display them inside an empty Streamlit frame within our app.
This method allows us to easily integrate the YOLOv8 tracking algorithm with our Streamlit app, giving us real-time updates on the objects being tracked. We used a similar approach in Part 2 of our series and will build upon that implementation here in Part 3.
For this implementation, we will create three files with names settings.py, object_tracking.py, and helper.py.
Let’s first write the code for settings.py file.
from pathlib import Path
import sys

# Get the absolute path of the current file
file_path = Path(__file__).resolve()

# Get the parent directory of the current file
root_path = file_path.parent

# Add the root path to the sys.path list if it is not already there
if root_path not in sys.path:
    sys.path.append(str(root_path))

# Get the relative path of the root directory with respect to the current working directory
ROOT = root_path.relative_to(Path.cwd())

# Sources
VIDEO = 'Video'
YOUTUBE = 'YouTube'
SOURCES_LIST = [VIDEO, YOUTUBE]

# Videos config
VIDEO_DIR = ROOT / 'videos'
VIDEO_1_PATH = VIDEO_DIR / 'video_1.mp4'
VIDEO_2_PATH = VIDEO_DIR / 'video_2.mp4'
VIDEOS_DICT = {
    'video_1': VIDEO_1_PATH,
    'video_2': VIDEO_2_PATH,
}

# ML Model config
MODEL_DIR = ROOT / 'weights'
DETECTION_MODEL = MODEL_DIR / 'yolov8n.pt'
SEGMENTATION_MODEL = MODEL_DIR / 'yolov8n-seg.pt'
In our implementation, the settings.py file plays an important role. This file contains the configuration settings for the videos and machine learning models that we will be using. With the help of the pathlib and sys libraries, the settings.py file allows us to set the path for the current file and its parent directory, add the root path to the sys.path list, and define the relative path of the root directory with respect to the current working directory.
Additionally, this file defines the sources and videos we will be using, as well as the location of our Machine-Learning models.
Now let’s write the code for object_tracking.py file.
# Python In-built packages
from pathlib import Path

# External packages
import streamlit as st
from ultralytics import YOLO

# Local Modules
import settings
import helper

# Setting page layout
st.set_page_config(
    page_title="Object Detection using YOLOv8",
    page_icon="🤖",
    layout="wide",
    initial_sidebar_state="expanded"
)

# Main page heading
st.title("Object Detection using YOLOv8")

# Sidebar
st.sidebar.header("ML Model Config")

# Model Options
model_type = st.sidebar.radio(
    "Select Task", ['Detection', 'Segmentation'])
confidence = float(st.sidebar.slider(
    "Select Model Confidence", 25, 100, 40)) / 100

# Selecting Detection Or Segmentation
if model_type == 'Detection':
    model_path = Path(settings.DETECTION_MODEL)
elif model_type == 'Segmentation':
    model_path = Path(settings.SEGMENTATION_MODEL)

# Load Pre-trained ML Model
try:
    model = YOLO(model_path)
except Exception as ex:
    st.error(f"Unable to load model. Check the specified path: {model_path}")
    st.error(ex)

st.sidebar.header("Image/Video Config")
source_radio = st.sidebar.radio(
    "Select Source", settings.SOURCES_LIST)

if source_radio == settings.VIDEO:
    helper.play_stored_video(confidence, model)
elif source_radio == settings.YOUTUBE:
    helper.play_youtube_video(confidence, model)
else:
    st.error("Please select a valid source type!")
The object_tracking.py file takes individual frames of a video or live video stream as input and returns the detected objects in real time. The script is designed to be integrated with a Streamlit web application, which provides a simple and intuitive user interface for configuring and running the object-tracking algorithm.
In the code, we first set up the page layout using Streamlit’s set_page_config() function and define the main page heading using the title() function. We then create a sidebar with options for configuring the ML model and the video source.
The script uses the Ultralytics package to load the pre-trained YOLOv8 model and the settings module to configure the video source and other parameters. Based on the user’s selection of task and confidence level, the script selects either the detection or segmentation model and then proceeds to load the model using the YOLO() function.
Finally, we check the user’s selection of video source and call the appropriate function from the helper module to process the video stream and display the results.
And now we will write out helper.py file. The helper.py file contains helper functions that are called from the object_tracking.py file to display the video and perform object detection on the selected source, either stored video or YouTube video. This file uses OpenCV and pafy libraries to read and process the video and Streamlit to display the video and detected objects.
import cv2
import streamlit as st
import pafy
import settings

def display_tracker_options():
    display_tracker = st.radio("Display Tracker", ('Yes', 'No'))
    is_display_tracker = True if display_tracker == 'Yes' else False
    if is_display_tracker:
        tracker_type = st.radio("Tracker", ("bytetrack.yaml", "botsort.yaml"))
        return is_display_tracker, tracker_type
    return is_display_tracker, None

def _display_detected_frames(conf, model, st_frame, image, is_display_tracking=None, tracker=None):
    # Resize the image to a standard size
    image = cv2.resize(image, (720, int(720*(9/16))))

    # Display object tracking, if specified
    if is_display_tracking:
        res = model.track(image, conf=conf, persist=True, tracker=tracker)
    else:

        # Predict the objects in the image using the YOLOv8 model
        res = model.predict(image, conf=conf)

        # Plot the detected objects on the video frame
        res_plotted = res[0].plot()
        st_frame.image(res_plotted,
                       caption='Detected Video',
                       channels="BGR",
                       use_column_width=True
                       )

def play_stored_video(conf, model):
    source_vid = st.sidebar.selectbox(
        "Choose a video...", settings.VIDEOS_DICT.keys())
    is_display_tracker, tracker = display_tracker_options()
    with open(settings.VIDEOS_DICT.get(source_vid), 'rb') as video_file:
        video_bytes = video_file.read()
    if video_bytes:
        st.video(video_bytes)
    if st.sidebar.button('Detect Video Objects'):
        try:
            vid_cap = cv2.VideoCapture(
                str(settings.VIDEOS_DICT.get(source_vid)))
            st_frame = st.empty()
            while (vid_cap.isOpened()):
                success, image = vid_cap.read()
                if success:
                    _display_detected_frames(conf,
                                             model,
                                             st_frame,
                                             image,
                                             is_display_tracker,
                                             tracker
                                             )
                else:
                    vid_cap.release()
                    break
        except Exception as e:
            st.sidebar.error("Error loading video: " + str(e))

def play_youtube_video(conf, model):
    source_youtube = st.sidebar.text_input("YouTube Video url")
    is_display_tracker, tracker = display_tracker_options()
    if st.sidebar.button('Detect Objects'):
        try:
            video = pafy.new(source_youtube)
            best = video.getbest(preftype="mp4")
            vid_cap = cv2.VideoCapture(best.url)
            st_frame = st.empty()
            while (vid_cap.isOpened()):
                success, image = vid_cap.read()
                if success:
                    _display_detected_frames(conf,
                                             model,
                                             st_frame,
                                             image,
                                             is_display_tracker,
                                             tracker
                                             )
                else:
                    vid_cap.release()
                    break
        except Exception as e:
            st.sidebar.error("Error loading video: " + str(e))
The helper.py file defines two functions: play_stored_video() and play_youtube_video().
The play_stored_video() function takes two arguments, conf and model, which are the confidence level and the YOLOv8 model, respectively. This function first displays a dropdown menu of available videos, then asks the user whether they want to display object tracking or not, and if yes, which tracker to use. The function then reads the video frame-by-frame and calls the _display_detected_frames function for each frame.
The _display_detected_frames function resizes the frame, calls the model.predict or model.track method depending on whether tracking is enabled, and plots the detected objects on the frame using the plot method. The resulting frame is then displayed using Streamlit.
The play_youtube_video function takes the same arguments as the play_stored_video function. This function asks the user for a YouTube video URL, and then performs similar operations as the play_stored_video function, but instead of reading a local file, it streams the video from the provided URL using the pafy library.
Both functions make use of the _display_detected_frames function, which takes six arguments: conf, model, st_frame, image, is_display_tracking, and tracker. This function first resizes the image, then either predicts the objects in the image using the model.predict method or tracks the objects using the model.track method, depending on the value of is_display_tracking.
If tracking is enabled, the tracker argument is used to specify which tracker to use. The function then plots the detected objects on the image using the plot method and displays the resulting image using Streamlit.
Run the object_tracking.py file with Streamlit with the following code:
streamlit run object_tracking.pyThe following screen will pop up:
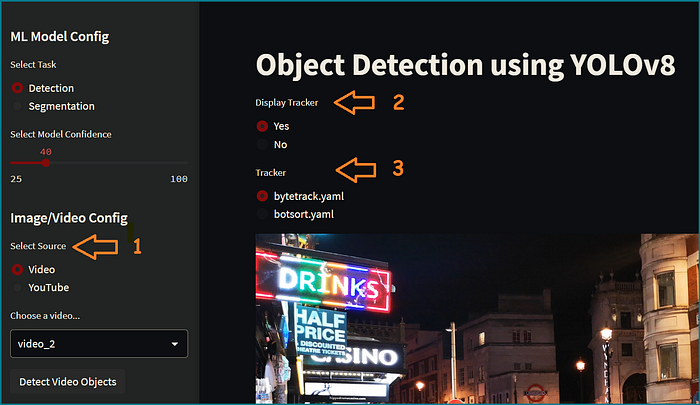
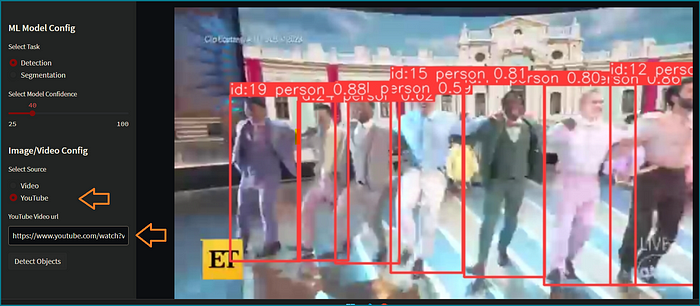
- Choose the video source from the available options, either a stored video or a YouTube URL.
- Choose whether to display the object tracker during video playback. If not, only object detection will be performed.
- If you choose to display the object tracker, you can select the type of tracker to use. Currently, you can choose between two options: Bytetrack and BotSORT.
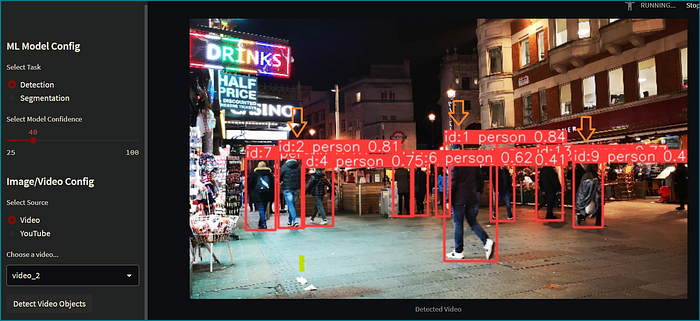
In the image above, you can see the unique identifiers of the detected objects, in this case, people. These unique identifiers or IDs are assigned by the object detection model to each detected object. This allows the model to keep track of the same object across multiple frames of the video or image sequence, which is useful for applications like object tracking or counting. The IDs can also be used to label and annotate the detected objects for further analysis or processing.
In the options below If you choose, No tracking:
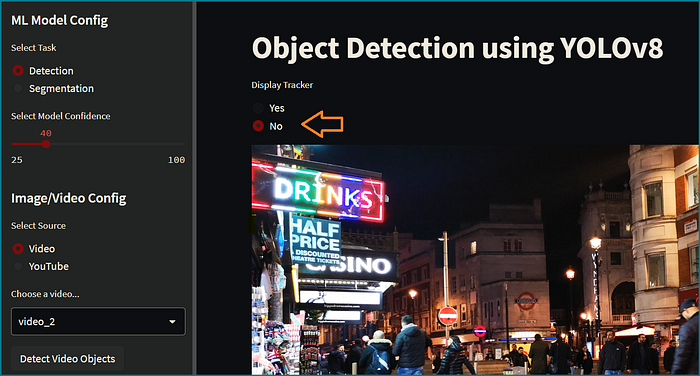
Then only the object detection algorithm will apply:
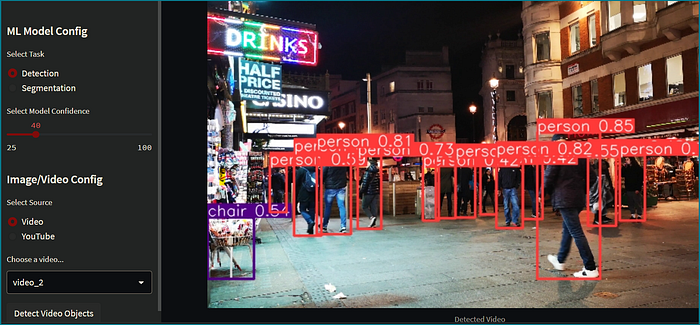
In the image above you can see our application is no more displaying the object IDs.
If you select the video source as YouTube, you can paste the URL of the YouTube video in the text box provided below. On pressing the ‘Detect Objects’ button, you will be able to view the frames of the video along with the detected objects, based on the options selected.
If you have followed all three parts of this series, your object detection application should be working smoothly as described above. However, if you encounter any issues or errors, please let me know in the comment box below. I will do my best to reply as soon as possible and assist you in resolving the issue.
GitHub Repository
To access the source codes used in this project, refer to my GitHub repository. It could serve as a valuable resource for future reference while working on your own projects.
Conclusion
In this article, we have learned how to add object tracking to our real-time object detection app using YOLOv8 and Streamlit. We started by exploring the importance of object tracking and how it can enhance the performance and accuracy of our detection system. Then, we introduced the two tracking architectures available in YOLOv8, BoT-SORT and ByteTrack, and showed how to use them to track objects in videos and with YouTube URLs.
Next, we focused on integrating the tracking algorithm into our Streamlit app. We showed how to pass frames one by one to the YOLOv8 model and then display them in our Streamlit app using an empty frame.
With the completion of this three-part series, we have leaned how to build a complete real-time object detection and tracking app using YOLOv8 and Streamlit. I hope that this tutorial has been helpful to you and provided you with the necessary knowledge and skills to build your custom object detection and tracking systems. If you have any questions or feedback, please feel free to leave a comment or get in touch with us. Thank you for reading!!!
Hey there👋! If you found this tutorial helpful, feel free to show your appreciation by clapping for it! Remember, you can clap multiple times if you liked it.