Building a Real-Time Object Detection and Tracking App with YOLOv8 and Streamlit: Part 2
Demo WebApp
This app is up and running on the Streamlit cloud server!!! Thanks ‘Streamlit’ for the community support for the cloud upload. You can check the demo of this web application on the link below.
In Part 1 of our tutorial series, we introduced you to our Real-Time Object Detection and Tracking App with YOLOv8 and Streamlit. We also provided a demonstration of the app’s capabilities using a few demo images.
We explained in detail our reasons for choosing YOLOv8 and Streamlit for this project. Additionally, we provided a step-by-step guide for setting up the environment, including installing dependencies and creating the required files and directories.
Now let’s move further to get our hands really dirty for Part 2 of this series. Which is:
Part 2: Exploring YOLOv8 Object Detection Model and Implementing it with Streamlit
In this section, we will dive deeper into the YOLOv8 object detection model and explore how to implement it with Streamlit. You’ll learn about the different components of the YOLOv8 model and how they work together to detect objects in real-time.
We’ll also cover the key steps involved in setting up a Streamlit app for object detection, including loading images and videos, displaying the results, and customizing the interface to improve user experience. By the end of this section, you’ll have a solid understanding of how to use YOLOv8 and Streamlit to build a powerful object detection app.
How The 3 Parts of This Blog Series Are Organised?
In this series, we will build a real-time object detection and tracking application using YOLOv8 and Streamlit. The main goal of this project is to provide a simple and efficient implementation of real-time object detection and tracking that can be easily customized and integrated into other applications.
This blog series is divided into the following three (3) Parts.
- Part 1: Introduction and Setup for YOLOV8 & Streamlit
- Part 2: Exploring YOLOv8 Object Detection Model and Implementing it with Streamlit
- Part 3: Adding Tracking Algorithm To The Object Detection
Creating a Streamlit WebApp for Image Object Detection with YOLOv8
To kick off our project, we will first learn the basics of building a web app that allows users to upload an image and perform object detection on it using the YOLOv8 model and Streamlit. This app will showcase the powerful capabilities of real-time object detection and tracking using the YOLOv8 algorithm.
Are you excited to build this small but meaningful app? Great! Open your favourite code editor and let’s get started by creating a new file named image_upload_app.py. Follow along as we explore the code for creating a simple WebApp with Streamlit and YOLOv8.
Step 1: Uploading an Image On Streamlit WebApp
Uploading an image is the first interaction point for the user with our app, so we want to make sure it’s as easy and intuitive as possible. We’ll see how to use Streamlit’s file_uploader widget to allow users to upload an image, and then we'll use the YOLOv8 model to perform object detection on the uploaded image. Let's get started!
Run the app using:
streamlit run app.pyNote: You can download some free images for the testing of this app from pexels or unsplash. In the searchbar on these app type ‘office’ and download some small sized office images for fast processing.
You will see the following page:
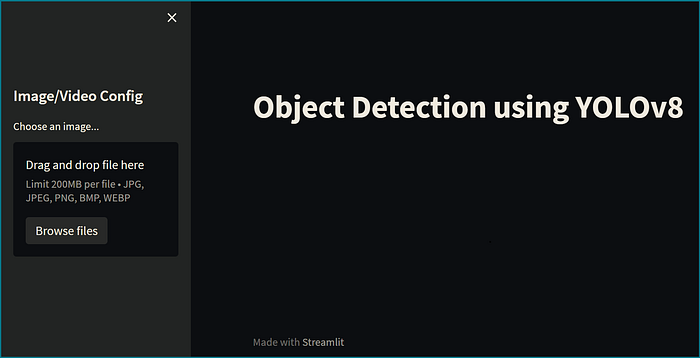
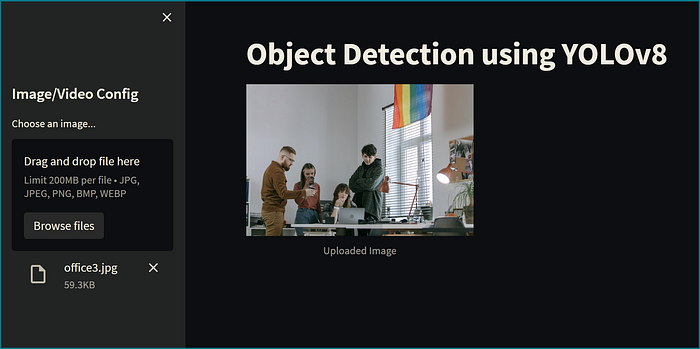
Click on the ‘Browse files’ button and upload the image. You will get a screen similar to this (depending on which image you upload).
Note: Once you have finished writing the code for the previous step, save the file and avoid making any further changes to it. Now, create a new file for the next section.
Step 2: Running Object-Detection on the Uploaded Image
After successfully uploading an image in our previous step, we are now ready to run object detection on the uploaded image using YOLOv8. This step involves loading the YOLOv8 model and passing the uploaded image through the model to identify the objects present in the image.
We will also visualize the output of the model with the identified objects highlighted in the image. Let’s dive into the code and see how we can accomplish this using Streamlit and YOLOv8.
In Part 1 of this series, we have discussed how to download a pre-trained weight file of the Yolov8 model. We downloaded yolov8n.pt file and saved it inside out weights directory. We will use the same weight file. Create a new file with the name image_object_detection_app.py and write the following lines of code:
Run this file using:
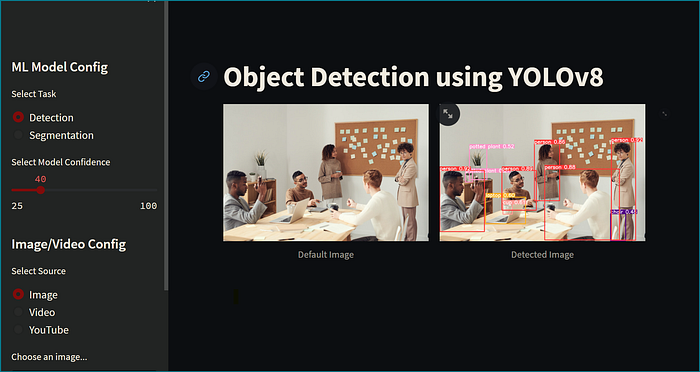
streamlit run image_object_detection_app.pyYou will see the following page:
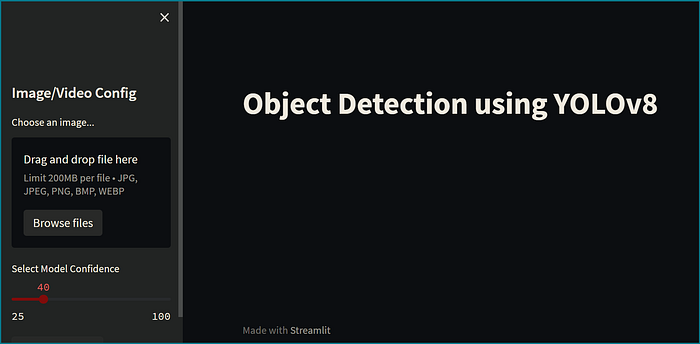
You can easily adjust the confidence level of the ML model with the help of a slider provided in the web application. Once you have uploaded the desired image, simply press the ‘Detect Objects’ button to start the object detection process in the background. Once the detection process is completed, the detected image will be displayed on the front end. Your screen will look similar to the image shown below:
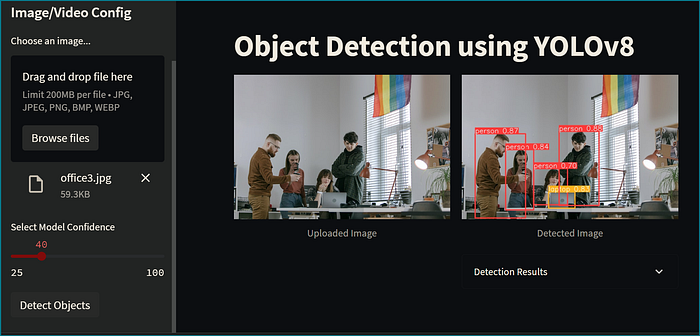
Congratulations! You have performed object detection using the YoloV8 model after uploading an image on Streamlit WebApp.
Object Detection On A Video Frames
In the previous section, we explored how to perform object detection on a single image using YOLOv8 and Streamlit. But what if we want to apply object detection on a video stream instead?
Note: For this section, You can download free demo videos from pexels or unsplash. Download at least two videos containing ‘office equipments’ and place them inside the
videosdirectory of our app.
In this section, we will see how to extend the previous app to work with video frames in real time. We will use the OpenCV library to capture video frames from a webcam or a video file, and then apply YOLOv8 object detection on each frame. Finally, we will display the resulting frames with bounding boxes and class labels in a Streamlit app. Let’s get started!”
Create a new file video_object_detection.py and write the following codes.
Run this file using:
streamlit run video_object_detection.pyYou will see the following page:
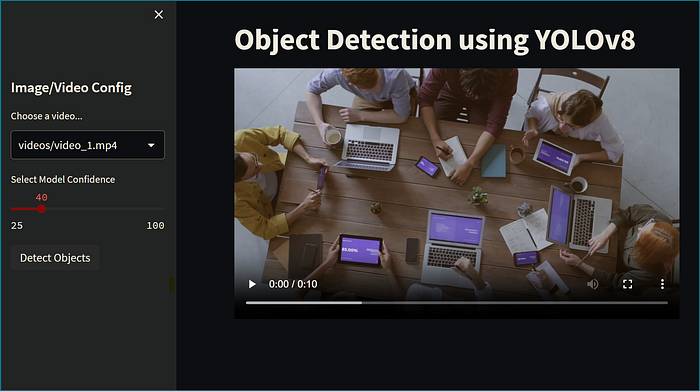
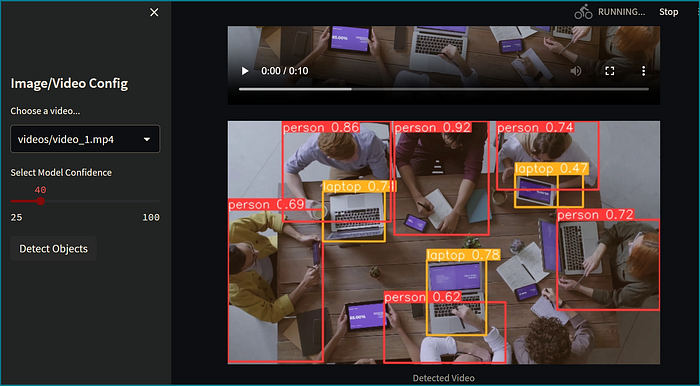
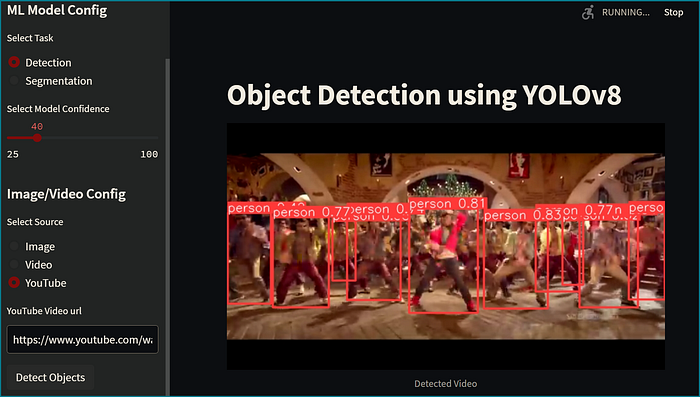
To adjust the confidence level of the ML model for video detection, you can use the provided slider. Once you have selected the video you want to detect, simply click the ‘Detect Objects’ button to start the object detection process in the background. The real-time detected frames of the video will be displayed on the front end. Your screen will resemble the image shown below:
Implementing Object Detection with YOLOv8 and Streamlit: Exploring the Code From GitHub
We are now ready to explore the codebase used to build our Real-Time Object Detection and Tracking App.
In this part of the tutorial series, we will explore the code behind this Real-Time Object Detection and Tracking App. We will dive deeper into the code used in our GitHub repository, which can be found at https://github.com/CodingMantras/yolov8-streamlit-detection-tracking.
We will take a closer look at the Python scripts that are responsible for the different functionalities of our WebApp, including settings, image and video object detection, tracking, and more. We will also explore how to integrate YOLOv8 and Streamlit to create a real-time object detection and tracking application.
So, let’s get started with settings.py file.
Creating Settings File
In Part-1, we explained the use of the settings.py file. This file contains all the constants and configuration settings required for the project.
The following code will go to this file:
from pathlib import Path
import sys

# Get the absolute path of the current file
file_path = Path(__file__).resolve()

# Get the parent directory of the current file
root_path = file_path.parent

# Add the root path to the sys.path list if it is not already there
if root_path not in sys.path:
    sys.path.append(str(root_path))

# Get the relative path of the root directory with respect to the current working directory
ROOT = root_path.relative_to(Path.cwd())

# Sources
IMAGE = 'Image'
VIDEO = 'Video'
YOUTUBE = 'YouTube'
SOURCES_LIST = [IMAGE, VIDEO, YOUTUBE]

# Images config
IMAGES_DIR = ROOT / 'images'
DEFAULT_IMAGE = IMAGES_DIR / 'office_4.jpg'
DEFAULT_DETECT_IMAGE = IMAGES_DIR / 'office_4_detected.jpg'

# Videos config
VIDEO_DIR = ROOT / 'videos'
VIDEO_1_PATH = VIDEO_DIR / 'video_1.mp4'
VIDEO_2_PATH = VIDEO_DIR / 'video_2.mp4'
VIDEO_3_PATH = VIDEO_DIR / 'video_3.mp4'
VIDEO_4_PATH = VIDEO_DIR / 'video_4.mp4'
VIDEO_5_PATH = VIDEO_DIR / 'video_5.mp4'
VIDEOS_DICT = {
    'video_1': VIDEO_1_PATH,
    'video_2': VIDEO_2_PATH,
    'video_3': VIDEO_3_PATH,
    'video_4': VIDEO_4_PATH,
    'video_5': VIDEO_5_PATH,
}

# ML Model config
MODEL_DIR = ROOT / 'weights'
DETECTION_MODEL = MODEL_DIR / 'yolov8n.pt'
SEGMENTATION_MODEL = MODEL_DIR / 'yolov8n-seg.pt'
The code in the settings.py file is used to set up various configuration parameters required for the project. Let's go through each section of the code:
- The
Pathmodule from thepathlibthe library is imported to create file path objects. - The absolute path of the current file is obtained using the
__file__attribute andresolve()method of the Path object. - The parent directory of the current file is obtained using the parent attribute of the Path object.
- The root path is added to the
sys.pathlist if it is not already there. This ensures that the root path is added to the Python search path to allow importing of modules from the project. - The relative path of the root directory with respect to the current working directory is obtained using the
relative_to()method of the Path object. - The sources of input for the project are defined in
SOURCES_LIST. - The images, videos, and ML model directories are defined using the ROOT path.
- The
IMAGES_DIRvariable specifies the path to the images directory. - The
DEFAULT_IMAGEandDEFAULT_DETECT_IMAGEvariables are used to set the default image and the detected image paths, respectively. - The
VIDEO_DIRvariable specifies the path to the videos directory. - The paths to the five videos are defined in the
VIDEOS_DICTdictionary. - The paths to the detection and segmentation models are defined in the
DETECTION_MODELandSEGMENTATION_MODELvariables, respectively.
Creating App.py File
The app.py is the main file of the project, which contains the Streamlit app. It defines the layout of the app, which includes a file uploader, a video player, a confidence threshold slider, and an object selection dropdown. It also defines the logic of the app, which includes loading the YOLOv8 model, detecting objects in the uploaded image or video frames, and displaying the detected objects.
The following code goes here:
# Python In-built packages
from pathlib import Path
import PIL

# External packages
import streamlit as st

# Local Modules
import settings
import helper

# Setting page layout
st.set_page_config(
    page_title="Object Detection using YOLOv8",
    page_icon="🤖",
    layout="wide",
    initial_sidebar_state="expanded"
)

# Main page heading
st.title("Object Detection using YOLOv8")

# Sidebar
st.sidebar.header("ML Model Config")

# Model Options
model_type = st.sidebar.radio(
    "Select Task", ['Detection', 'Segmentation'])
confidence = float(st.sidebar.slider(
    "Select Model Confidence", 25, 100, 40)) / 100

# Selecting Detection Or Segmentation
if model_type == 'Detection':
    model_path = Path(settings.DETECTION_MODEL)
elif model_type == 'Segmentation':
    model_path = Path(settings.SEGMENTATION_MODEL)

# Load Pre-trained ML Model
try:
    model = helper.load_model(model_path)
except Exception as ex:
    st.error(f"Unable to load model. Check the specified path: {model_path}")
    st.error(ex)
st.sidebar.header("Image/Video Config")
source_radio = st.sidebar.radio(
    "Select Source", settings.SOURCES_LIST)
source_img = None

# If image is selected
if source_radio == settings.IMAGE:
    source_img = st.sidebar.file_uploader(
        "Choose an image...", type=("jpg", "jpeg", "png", 'bmp', 'webp'))
    col1, col2 = st.columns(2)
    with col1:
        try:
            if source_img is None:
                default_image_path = str(settings.DEFAULT_IMAGE)
                default_image = PIL.Image.open(default_image_path)
                st.image(default_image_path, caption="Default Image",
                         use_column_width=True)
            else:
                uploaded_image = PIL.Image.open(source_img)
                st.image(source_img, caption="Uploaded Image",
                         use_column_width=True)
        except Exception as ex:
            st.error("Error occurred while opening the image.")
            st.error(ex)
    with col2:
        if source_img is None:
            default_detected_image_path = str(settings.DEFAULT_DETECT_IMAGE)
            default_detected_image = PIL.Image.open(
                default_detected_image_path)
            st.image(default_detected_image_path, caption='Detected Image',
                     use_column_width=True)
        else:
            if st.sidebar.button('Detect Objects'):
                res = model.predict(uploaded_image,
                                    conf=confidence
                                    )
                boxes = res[0].boxes
                res_plotted = res[0].plot()[:, :, ::-1]
                st.image(res_plotted, caption='Detected Image',
                         use_column_width=True)
                try:
                    with st.expander("Detection Results"):
                        for box in boxes:
                            st.write(box.data)
                except Exception as ex:
                    # st.write(ex)
                    st.write("No image is uploaded yet!")

elif source_radio == settings.VIDEO:
    helper.play_stored_video(confidence, model)

elif source_radio == settings.YOUTUBE:
    helper.play_youtube_video(confidence, model)

else:
    st.error("Please select a valid source type!")
This code defines the main functionality of a Streamlit app for object detection using YOLOv8. Here’s what it does:
- Imports necessary packages:
The code begins by importing the necessary packages, including Path and PIL from Python's in-built packages, streamlit for creating the app, settings and helper modules from the local repository.
- Sets the app title and creates a sidebar:
The WebApp title is set to “Object Detection using YOLOv8” using the st.title() function. Then, a sidebar is created using the st.sidebar object.
- Allows users to select ML model and confidence level:
The sidebar allows users to select the type of task (detection or segmentation) and the confidence level for the selected model. The st.sidebar.radio() function creates a radio button for selecting the task, and the st.sidebar.slider() function creates a slider for selecting the confidence level.
- Loads the ML model:
The code then loads the selected model from the specified path using the helper.load_model() function. If the model loading fails, an error message is displayed using st.error().
- Allows users to select image/video source:
The sidebar then allows users to select the source of the image or video for object detection. The st.sidebar.radio() function creates a radio button for selecting the source type, and the st.sidebar.file_uploader() function allows the user to upload an image if the "Image" source type is selected.
- Displays image and detection results:
If the “Image” source type is selected, the code displays the selected image and the detected objects in a separate column. The detection is performed using the model.predict() function with the uploaded image and the specified confidence level.
The detection results are then plotted on the image using the res[0].plot() function and displayed using st.image(). The st.expander() function is used to expand the detection results and display the bounding boxes around the detected objects.
- Plays stored videos, and YouTube videos:
If any of the other source types are selected (video, or YouTube video), the corresponding function from the helper module is called to play the video and perform object detection on each frame.
- Displays error message if invalid source type is selected: If an invalid source type is selected, an error message is displayed using
st.error().
Creating Helper.py
As explained in Part 1, the helper.py file contains all the helper functions used in the project. It includes functions to load the YOLOv8 model, preprocess the input image or video frames, and post-process the output bounding boxes and class labels.
from ultralytics import YOLO
import streamlit as st
import cv2
import pafy

import settings

def load_model(model_path):
    model = YOLO(model_path)
    return model

def _display_detected_frames(conf, model, st_frame, image):
    # Resize the image to a standard size
    image = cv2.resize(image, (720, int(720*(9/16))))

    # Predict the objects in the image using the YOLOv8 model
    res = model.predict(image, conf=conf)

    # Plot the detected objects on the video frame
    res_plotted = res[0].plot()
    st_frame.image(res_plotted,
                   caption='Detected Video',
                   channels="BGR",
                   use_column_width=True
                   )

def play_youtube_video(conf, model):
    source_youtube = st.sidebar.text_input("YouTube Video url")
    if st.sidebar.button('Detect Objects'):
        try:
            video = pafy.new(source_youtube)
            best = video.getbest(preftype="mp4")
            vid_cap = cv2.VideoCapture(best.url)
            st_frame = st.empty()
            while (vid_cap.isOpened()):
                success, image = vid_cap.read()
                if success:
                    _display_detected_frames(conf,
                                             model,
                                             st_frame,
                                             image,
                                             )
                else:
                    vid_cap.release()
                    break
        except Exception as e:
            st.sidebar.error("Error loading video: " + str(e))

def play_stored_video(conf, model):
    source_vid = st.sidebar.selectbox(
        "Choose a video...", settings.VIDEOS_DICT.keys())
    with open(settings.VIDEOS_DICT.get(source_vid), 'rb') as video_file:
        video_bytes = video_file.read()

    if video_bytes:
        st.video(video_bytes)
    if st.sidebar.button('Detect Video Objects'):
        try:
            vid_cap = cv2.VideoCapture(
                str(settings.VIDEOS_DICT.get(source_vid)))
            st_frame = st.empty()
            while (vid_cap.isOpened()):
                success, image = vid_cap.read()
                if success:
                    _display_detected_frames(conf,
                                             model,
                                             st_frame,
                                             image,
                                             )
                else:
                    vid_cap.release()
                    break
        except Exception as e:
            st.sidebar.error("Error loading video: " + str(e))
The code inside helper.py defines several functions to detect objects in videos using the YOLOv5 model and Streamlit.
- load_model():
The load_model() function loads the YOLOv5 model using the ultralytics library and returns the model object.
- _display_detected_frames()
The _display_detected_frames() function resizes the input frame and uses the YOLOv8 model to detect objects in the frame. We will implement the tracking of objects in the Part-3 of this blog series. The function then plots the detected objects on the frame and displays them in the Streamlit app.
The play_youtube_video(), and play_stored_video() functions use different video sources to load video frames and call the _display_detected_frames() function to detect objects in the frames. These functions also use Streamlit widgets to display user input options and the detected video frames.
This code provides a simple and interactive way to use the YOLOv5 model for object detection in videos.
Run this WebApp ussing:
streamlit run app.pyYou will see the following page:
To detect objects in a video select a video and press the ‘Detect Objects’ button.
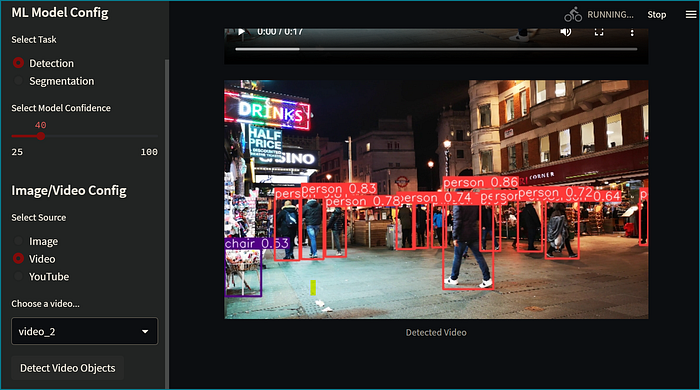
To detect objects inside a YouTube Video paste the YouTube video link inside the YouTube Video URL textbox and press the 'Detect Objects' button the youtube video will start playing with detected objects.
GitHub Repository
To access the source codes used in this project, refer to my GitHub repository. It could serve as a valuable resource for future reference while working on your own projects.
Conclusion
I hope you found the implementation of YOLOv8 with Streamlit for image, video, and YouTube video object detection informative and useful. The combination of YOLOv8 and Streamlit enables the development of high-performance object detection applications with a user-friendly interface. This approach makes it easier to detect and track objects in real time, allowing for a wide range of use cases in various industries, including security, retail, and entertainment.
As we come to the end of Part 2 of this 3-part blog series, I would like to remind you to stay tuned for Part 3, where we will take our object detection application to the next level by implementing object tracking. With object tracking, we will be able to track objects across frames in a video and perform more sophisticated analysis of the movements of those objects.
In part 3, we will learn how to integrate a tracking algorithm with our existing YOLOv8 and Streamlit application. This addition will provide a comprehensive solution for object detection and tracking, opening up even more opportunities for real-world applications. So, keep an eye out for part 3 and stay ahead of the curve with this powerful combination of technologies.
Hey there👋! If you found this tutorial helpful, feel free to show your appreciation by clapping for it! Remember, you can clap multiple times if you liked it.