Building a Real-Time Object Detection and Tracking App with YOLOv8 and Streamlit: Part 1
Check The Demo Of This WebApp
This app is up and running on the Streamlit cloud server!!! Check the demo of this web application on the link below.
yolov8-streamlit-detection-tracking-webapp
Thanks ‘Streamlit’ for the community support for the cloud upload.
Please note this project is intended for educational purposes only and should not be used in production environments.
Introduction
Object Detection and Tracking in real-time video feed is a crucial area of computer vision that has numerous applications in various fields like surveillance, automotive, and robotics.
The demand for real-time object detection and tracking in video frames is increasing every day due to the need for automated systems that can recognize and track objects, identify their position and classify them in real-time.
In this project, we have developed an application that uses the YOLOv8 object detection and tracking algorithm to detect and track objects in real-time video streams. The application's front end is built using the Streamlit framework, which provides an intuitive and interactive user interface for the end-users to interact with the system.

How The 3 Parts of This Blog Series Are Organised?
In this series, we will build a real-time object detection and tracking application using YOLOv8 and Streamlit. The main goal of this project is to provide a simple and efficient implementation of real-time object detection and tracking that can be easily customized and integrated into other applications.
This blog series is divided into the following three (3) Parts.
- Part 1: Introduction and Setup for YOLOV8 & Streamlit
- Part 2: Exploring the YOLOv8 Model and Object Detection
- Part 3: Adding Tracking Algorithm To The Object Detection
Part 1: Introduction and Setup for YOLOV8 & Streamlit
Welcome to Part 1 of our three-part tutorial series on Building a Real-Time Object Detection and Tracking App with YOLOv8 and Streamlit. In this series, we will walk you through building an end-to-end object detection and tracking app that can identify and track objects in real-time from a video stream.
In Part 1, we will introduce the project, give you a demo of the app in action, and explain why we chose YOLOv8 and Streamlit for this project. We will also guide you through the setup process, including installing dependencies and creating the necessary files and directories.
By the end of this series, you will have the skills to build your own real-time object detection and tracking app and apply it to your domain-specific problems.
So, let’s dive in!
Demo of the Real-Time Object Detection and Tracking App
Here are a few demo images from the WebApp project that we will create and build together. These images demonstrate the functionalities of our project.
- HomePage: The arrows show “ML Model Config”, “Image/Video Config”, and “Default and Detected images” on the homepage.
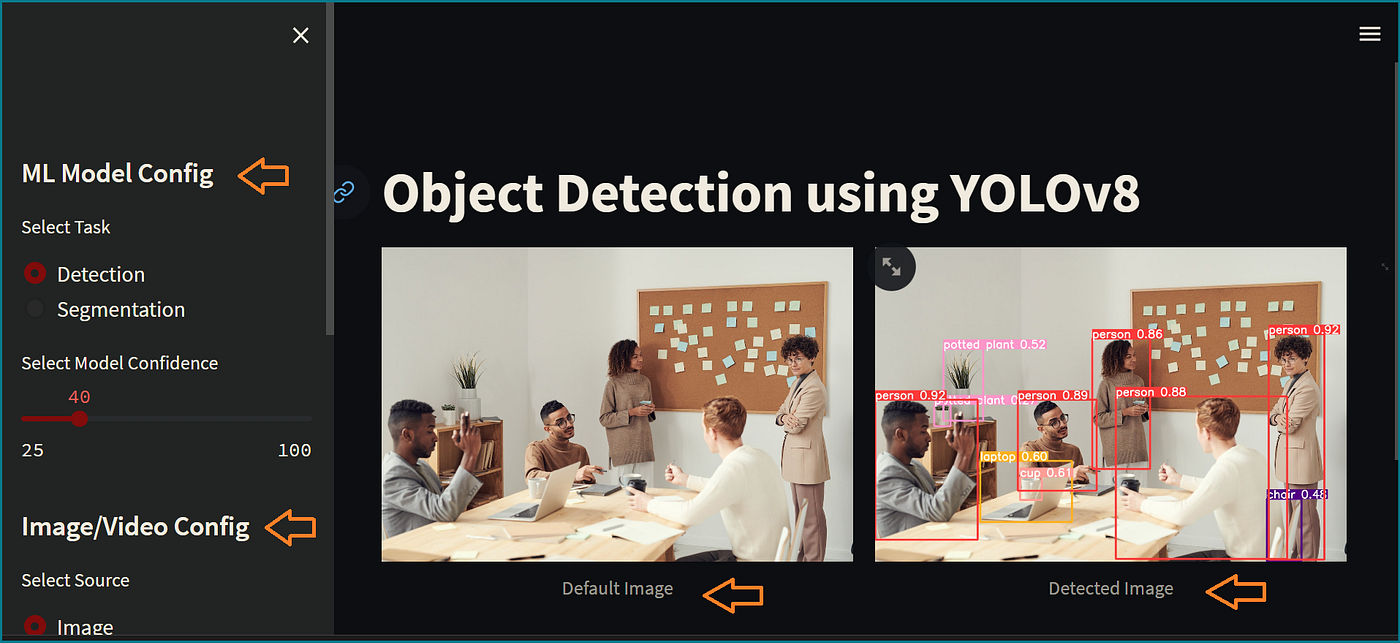
- Object Detection: Upload an image on the WebApp and show detected objects.

- Segmentation: Upload an image on the WebApp and depict segmentation.

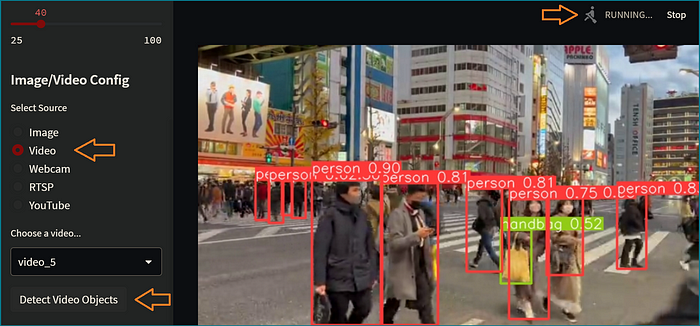
- Frame by Frame Object Detection of A Video.
- Frame by Frame Object Detection of any Youtube Video.

- Frame by Frame Object Detection And Tracking of any video.

Object Detection And Tracking
Object detection and tracking are fundamental tasks in computer vision having wide-ranging applications in various fields, such as surveillance, autonomous driving, robotics, and more.
These techniques work together to extract valuable information from visual data, enabling machines to understand and interpret the world around them.
Object Detection
Object detection is a process used to identify and locate objects within an image or video frame. This task not only involves recognizing the type of object present but also drawing a bounding box around it, which helps pinpoint its exact location.
Object detection algorithms typically employ deep learning models, such as YOLO, Faster R-CNN, and SSD, to detect objects in images or video frames. These models use convolutional neural networks (CNNs) to extract features from the input data and then use these features to classify and localize objects.
Object Tracking
Object tracking, on the other hand, involves estimating the state of an object, such as its position, velocity, and orientation, over time.
This requires analyzing the temporal information of the video and associating the detected objects from frame to frame. Object tracking is especially important in applications that involve moving objects, such as surveillance or autonomous vehicles.
Both object detection and tracking are essential components of many real-world applications that require intelligent systems to understand and interact with their environment.
Real-time Detection in Video Frames
Real-time object detection and tracking in video frames is a challenging task due to the need for high processing speeds and accuracy.
The YOLOv8 algorithm used in this project provides real-time object detection and tracking capabilities, making it ideal for applications that require fast and accurate object detection in real-time video streams.
Why YOLOv8 is a Good Choice for Object Detection and Tracking
YOLOv8 (You Only Look Once version 8) is an object detection model that uses deep neural networks to detect objects in images or videos. YOLOv8 is one of the latest versions of the YOLO series, and it offers improved accuracy and faster detection speeds.
YOLOv8 is a cutting-edge, state-of-the-art (SOTA) model that builds upon the success of previous YOLO versions and introduces new features and improvements to further boost performance and flexibility. YOLOv8 is designed to be fast, accurate, and easy to use, making it an excellent choice for a wide range of object detection and tracking, instance segmentation, image classification and pose estimation tasks.
It uses a single neural network to divide an input image or video into a grid of cells, and each cell is responsible for detecting objects in that region. The network also predicts bounding boxes, confidence scores, and class probabilities for each object detected.

The bounding boxes are used to localize the object in the image, and the confidence scores indicate the accuracy of the detection. The class probabilities determine the type of object detected, such as a car or a person.
Why Streamlit is a Good Choice for Building a Real-Time App
Streamlit makes it easy to build web-based user interfaces for machine learning applications, enabling data scientists and developers to share their work with non-technical stakeholders.
Streamlit is an open-source framework that simplifies the process of building web applications in Python.
In this project, Streamlit is used to create a web application that displays the processed video stream, allowing users to adjust various ML Model parameters such as the detection threshold confidence and the tracking algorithm.
Project Setup: Installing Dependencies and Creating Required Files and Directories
Before diving into the project, make sure you have the following dependencies installed on your system.
The project requires Python 3.7 or higher and several Python packages such as NumPy, OpenCV, PyTorch, and Streamlit. We can install these packages using pip into a separate virtual environment.
Creating Virtual Environment
When working on a Python project, it’s important to keep your dependencies separate from your global Python environment to prevent conflicts between different projects.
One way to achieve this is by creating a virtual environment, which is an isolated Python environment that can be used to install and manage project-specific dependencies.
This ensures that your project runs smoothly and consistently, even if different versions of the same package are required for different projects.
In this section, we will go through the steps to create a virtual environment for the Python project at the GitHub repo using the virtualenv package.
Steps:
Install the virtualenv package by running the following command in the terminal:
pip install virtualenvCreate a new virtual environment by running the following command in the terminal:
virtualenv venvThis will create a new folder named “venv” in your project’s root directory. This folder will contain a clean and isolated Python environment for your project.
Activate the virtual environment by running the following command in the terminal:
source venv/bin/activateThis will activate the virtual environment and you will see the name of your virtual environment in the terminal prompt.
Installing CUDA-Enabled Torch & Torchvision
Here are the steps to download Torch and Torchvision with CUDA on your system:
- First, check if you have a CUDA-enabled GPU. You can do this by running the following command in the terminal:
nvcc --versionIf you get a version number, it means you have a CUDA-enabled GPU.
- Next, go to the official PyTorch website (https://pytorch.org/) and select the appropriate installation options for your system. You will need to select the appropriate version of PyTorch that supports CUDA.
- Once you have selected the appropriate options, copy the installation command provided on the PyTorch website.
- Open a terminal window and paste the copied command to install PyTorch. Which may look like this:
pip install torch==1.7.0+cpu torchvision==0.8.1+cpu -f <https://download.pytorch.org/whl/cu102/torch_stable.html>- This will also automatically install Torchvision.
- After installation, verify that PyTorch and Torchvision are working by opening a Python interpreter and running the following commands:
import torch
import torchvision

print(torch.__version__)
# '1.13.0+cu117'

print(torch.cuda.is_available())
# True

print(torchvision.__version__)
# '0.14.0+cu117'
If you get the version numbers and True for torch.cuda.is_available(), it means PyTorch and Torchvision are installed and working correctly.
Installing Required Packages
After this, you are ready to install yolov8 (Ultralytics), Streamlit and Pafy packages.
pip install ultralytics, streamlit, pafyOnce you’ve installed all the required dependencies, you’re ready to start building this project!
Downloading Pre-trained Yolov8 Weights
The YOLOv8 model is a deep neural network that has been trained on a large dataset to detect objects in images and videos. To use this model for object detection and tracking, we need to download the pre-trained YOLOv8 weights.
In this section, we will explain how to download the pre-trained YOLOv8 weights and use them in our project.
Use this link to download yolov8n.pt weight file. The yolov8n weight file is the smallest of the YOLOv8 models, making it faster and more efficient than the other variants. With its high accuracy and ability to detect objects in real-time, this model has become a popular choice for many computer vision applications.
Or You can download another version of YOLOV8 weight by following these steps:
Step 1: Open the GitHub repository for the YOLOv8 model.
Step 2: Navigate to the ‘Detection’ section on the readme file.

Step 3: Find the Model table (Shown above) with the information about all the models. Select the link for the required weight and it will start downloading on your system.
Step 4: Once the ‘yolov8n.weights’ (or your desired yolov8 weight) file is downloaded and saved, we can use it to load the YOLOv8 model in our project.
Creating Weight Directory
Create a directory named ‘weight’ and save the downloaded Yolov8 weight inside this directory. We will use this weight file for object detection and tracking task. You can have more than one weight file here. We just need to add that weight file path inside our settings.py file.
Creating Videos Directory
Create a directory named ‘videos’ inside your project folder to store all the video files here. We will select these videos for object detection and tracking tasks.
Creating Images Directory
Create another directory named ‘images’ to store all the images you want to detect objects upon.
Creating Required Python files
We will create the following Python files for our project:
settings.py
This file contains all the constants and configuration settings required for the project. It defines the path to the YOLOv8 model, the confidence threshold, the non-maximum suppression threshold, and the names of the objects to detect. It also contains settings related to the Streamlit app, such as the default image and video URLs.
app.py
This is the project's main file, which contains the Streamlit app. It defines the layout of the app, which includes a file uploader, a video player, a confidence threshold slider, and an object selection dropdown. It also defines the logic of the app, which includes loading the YOLOv8 model, detecting objects in the uploaded image or video frames, and displaying the detected objects.
helper.py
This file contains helper functions used in the project. It includes functions to load the YOLOv8 model, preprocess the input image or video frames, and post-process the output bounding boxes and class labels.
Your project folder should look like this.

Hello World In Streamlit
Open the app.py file in your favourite code editor and import the Streamlit library:
import streamlit as stNow you can use the st.write() function to display your "Hello World!" message. Here's the complete code:
import streamlit as st

st.write("Hello, World!")
Run the code by opening a terminal and navigating to the directory where you saved app.py. Then, run the following command:
streamlit run app.pyThis will start the Streamlit server and open your web browser to the default Streamlit page. You should see your “Hello, World!” message displayed on the page.

Congratulations! You’ve just created your first Streamlit app. From here, we will explore Streamlit’s many features and build our WebApp in Part-2.
After setting up our environment and creating all required directories and Python files we are ready to start writing codes for our “Real-Time Object Detection and Tracking App with YOLOv8 and Streamlit” project.
GitHub Repository
To access the source codes used in this project, refer to my GitHub repository. It could serve as a valuable resource for future reference while working on your projects.
Conclusion
In this first part of our tutorial series, we have introduced you to the Real-Time Object Detection and Tracking App with YOLOv8 and Streamlit. We gave you a demo of the app in action and explained why we chose YOLOv8 and Streamlit for this project. We also walked you through the setup process, including installing dependencies and creating the necessary files and directories.
In Part 2, we will focus on implementing object detection and tracking in video frames using YOLOv8 and OpenCV. We will explain the concept of object detection and tracking, and guide you through the process of setting up your computer vision environment and integrating YOLOv8 with OpenCV.
Do check Part 2 of this series, and don’t hesitate to reach out to us if you have any questions or feedback. Let’s continue building this amazing app together!
Hey there👋! If you found this tutorial helpful, feel free to show your appreciation by clapping for it! Remember, you can clap multiple times if you really like it.